
Ready-Made Framing Guide
Proper framing helps present each student’s artwork beautifully, protects it during installation and display, and elevates the overall exhibition experience.
 For the exhibition, frames must:
- Be solid wood or sturdy metal (no plastic, MDF, particle board, or lightweight poster frames)
- Include hooks or D-rings with hanging wire installed (no sawtooth hangers)
- Have a mat with at least a 1″ border
Custom framing is not required. Many families choose standard ready-made frames with a mat, or purchase a ready-made frame and have a custom mat cut as a more affordable option.
Most local frame shops and craft stores can:
- Cut a custom mat to your artwork’s exact opening size
- Install the artwork into the mat and frame
- Close and secure the frame backing
- Install hooks, D-rings, and hanging wire
When using standard frame sizes, the mat borders may not be perfectly even on all sides. This is completely normal. The goal is to create a clean visual border between the artwork and the frame.
There is usually a small fee for mat cutting and installation, but it is generally much less expensive than full custom framing.
Jump to Your Artwork Size or Topic
If your child’s artwork size is not listed here and you need help, please contact info@marvegos.com.
Standard Marvegos Artwork Sizes
- 12″ × 18″ Artwork
- 14″ × 17″ Artwork
- 18″ × 24″ Artwork
- 17.5″ × 23″ Artwork
- 19″ × 25″ Artwork
- 15″ × 22″ Artwork
- 12.5″ × 19″ Artwork
- Canvas Artwork
Specialty Formats
Additional Resources
- Where to Buy Frames
- Helpful Search Terms
- How to Assemble the Frame and Hanging Wire
If Your Child’s Artwork Is 12″ × 18″
Recommended Frame Sizes
- 15″ × 21″ frame
- 16″ × 20″ frame (most common option)
- 18″ × 24″ frame
- 20″ × 24″ frame (for a wider mat border)
Mat Recommendation
Use a mat with a 12″ × 18″ opening, or have a custom mat cut.
If Your Child’s Artwork Is 14″ × 17″
Recommended Frame Sizes
- 16″ × 20″ frame
- 18″ × 24″ frame
- 20″ × 24″ frame
Mat Recommendation
14″ × 17″ is not a standard frame or mat size. Have a custom mat cut slightly smaller than the artwork so the mat overlaps the edges and holds the artwork securely in place.
If Your Child’s Artwork Is 18″ × 24″
Recommended Frame Sizes
- 22″ × 28″ frame
- 24″ × 30″ frame
Mat Recommendation
Use a mat with an 18″ × 24″ opening, or have a custom mat cut.
If Your Child’s Artwork Is 17.5″ × 23″
Recommended Frame Sizes
- 22″ × 28″ frame
- 24″ × 30″ frame
Mat Recommendation
17.5″ × 23″ is not a standard frame or mat size. Have a custom mat cut slightly smaller than the artwork so the mat overlaps the edges and holds the artwork securely in place.
Example opening size:
17.25″ × 22.75″
If Your Child’s Artwork Is 19″ × 25″
Recommended Frame Sizes
- 22″ × 28″ frame
- 24″ × 30″ frame
Mat Recommendation
Have a custom mat cut slightly smaller than the artwork size.
If Your Child’s Artwork Is 15″ × 22″
Recommended Frame Sizes
- 18″ × 24″ frame
- 20″ × 24″ frame
- 24″ × 30″ frame
Mat Recommendation
Have a custom mat cut slightly smaller than the artwork size.
If Your Child’s Artwork Is 12.5″ × 19″
Recommended Frame Sizes
- 18″ × 24″ frame
- 20″ × 24″ frame
Mat Recommendation
Have a custom mat cut slightly smaller than the artwork size.
Canvas Artwork
Canvas artwork does not require glass or mat. Floater frames are commonly used for canvas artwork.
Recommended Frame Sizes
Choose a frame that matches the canvas size exactly.
Examples:
- 11″ × 14″ canvas → 11″ × 14″ frame
- 16″ × 20″ canvas → 16″ × 20″ frame
- 18″ × 24″ canvas → 18″ × 24″ frame
Square Artwork
If Your Child’s Artwork Is 17.5″ × 17.5″ or 18″ × 18″
Recommended Frame Sizes
- 20″ × 20″ frame
- 22″ × 22″ frame
- 24″ × 24″ frame
If Your Child’s Artwork Is 19″ × 19″
Recommended Frame Sizes
- 22″ × 22″ frame
- 24″ × 24″ frame
Mat Recommendation
Have a custom mat cut slightly smaller than the artwork size.
Panoramic Artwork
These formats do not fit well with standard ready-made frame sizes. For the best presentation, we recommend custom framing.
Common Panoramic Sizes
- 9″ × 24″
- 11″ × 30″
- 10” x 22”
3D Artwork
Fully three-dimensional artwork, such as ceramic sculptures, does not need to be framed.
Students occasionally create relief sculptures on 12″ × 12″ Masonite panels. A relief sculpture is artwork with one flat side designed to rest against a wall or table surface, along with raised or 3D areas that extend outward.
Recommended Frame Type
- 12″ × 12″ shadow box frame
- At least 1–2 inches deep
Additional Notes
Some sculptures may include elements that extend beyond the Masonite panel. In these cases, choose a shadow box large enough to accommodate the widest point of the sculpture.
Multiple-Piece Artwork (Diptychs & Triptychs)
Some students create artwork designed as multiple connected pieces that are meant to be displayed together.
A diptych is an artwork made up of two separate pieces displayed side-by-side.
A triptych is an artwork made up of three separate pieces displayed together as one larger artwork.
There are two common framing approaches for these works:
Option 1: Frame Each Piece Individually
Each artwork panel can be framed separately using matching frames and mats. This is often the simplest and most affordable option.
Option 2: Frame All Pieces Together
Families may also choose to display all pieces together inside one larger frame. This can often still be done using a ready-made frame, as long as the frame is large enough to fit all artwork pieces and mat borders together.
For this option, a custom multi-opening mat (“window mat”) is professionally cut so each artwork has its own space within the frame. Most local frame shops can create this for you, even when using a ready-made frame.
Because these projects vary greatly in size and spacing, we recommend visiting a local frame shop for guidance if choosing this option.
Where to Buy Frames
Affordable ready-made frames can often be found at:
- Michaels
- IKEA (solid wood and sturdy metal frames only)
- Target
- Amazon
- Blick Art Materials
- Local frame shops
Online retailers often offer more size options and competitive pricing.
Helpful Search Terms
Once you know the frame size, searching online can be easier if you include both the frame size and artwork size.
Examples:
- “16 × 20 wooden frame with 12 × 18 mat”
- “20 × 24 wooden frame with 18 × 24 mat”
- “24 × 30 wooden frame with mat”
- “12 × 12 shadow box frame”
- “18 × 24 canvas floater frame”
How to Assemble a Ready-Made Frame
Installing the Artwork Into the Frame
Most ready-made frames can be opened from the back.
- Open the frame backing.
- Remove the sample artwork or insert if included with the frame.
- Use the provided mat or place the custom mat inside the frame.
- Center the artwork behind the mat opening.
- Secure the artwork to the back of the mat using small pieces of artist tape or painter’s tape.
- Place the mat and artwork back into the frame.
- Close and secure the frame backing.
Tip: Make sure the artwork is clean and free of dust or fingerprints before closing the frame.
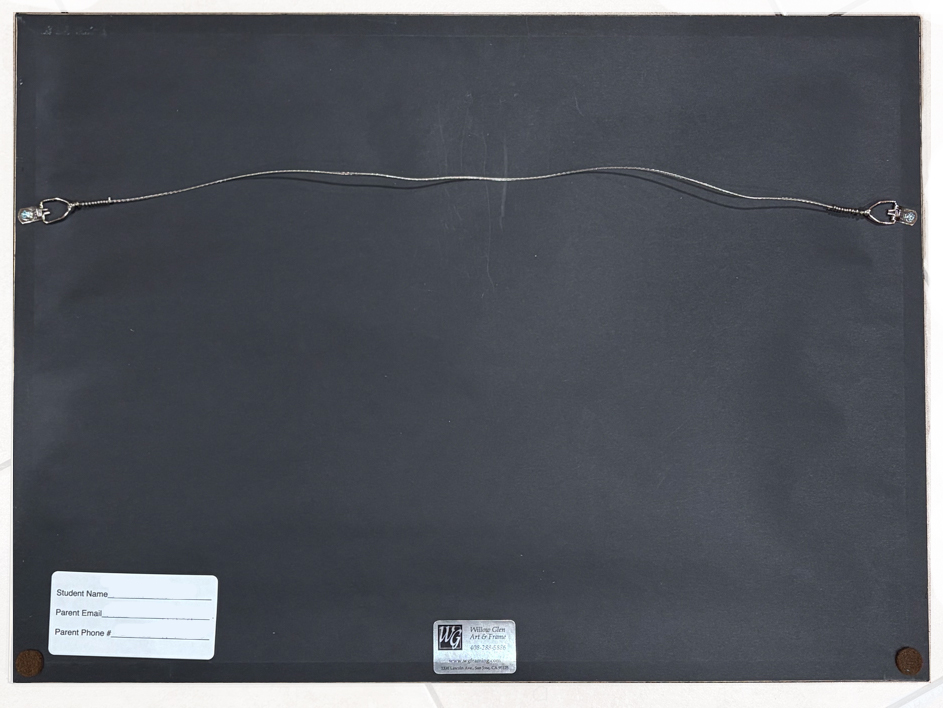
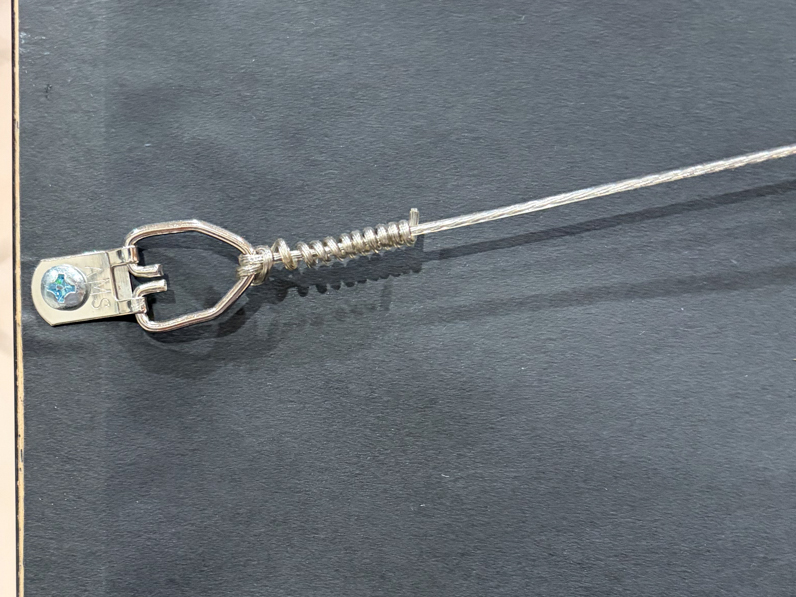
Installing Hanging Wire
Exhibit artwork must include picture hanging wire attached to hooks or D-rings.
Materials Needed
- 2 D-rings or picture hooks
- Proper picture hanging wire (no string, yarn, ribbon, paracord, and other similar materials)
- Screwdriver
Installation Steps
- Attach one D-ring or hook to each side of the back of the frame, about one-third of the way down from the top.
- Thread the hanging wire through one D-ring or hook.
- Pull the wire across to the other side and thread it through the second D-ring.
- Pull the wire fairly tight so it does not sag loosely behind the frame.
- Twist the wire securely around itself on both sides.
Tip: When lifting the frame by the wire, the top of the wire should not rise above the top edge of the frame.